


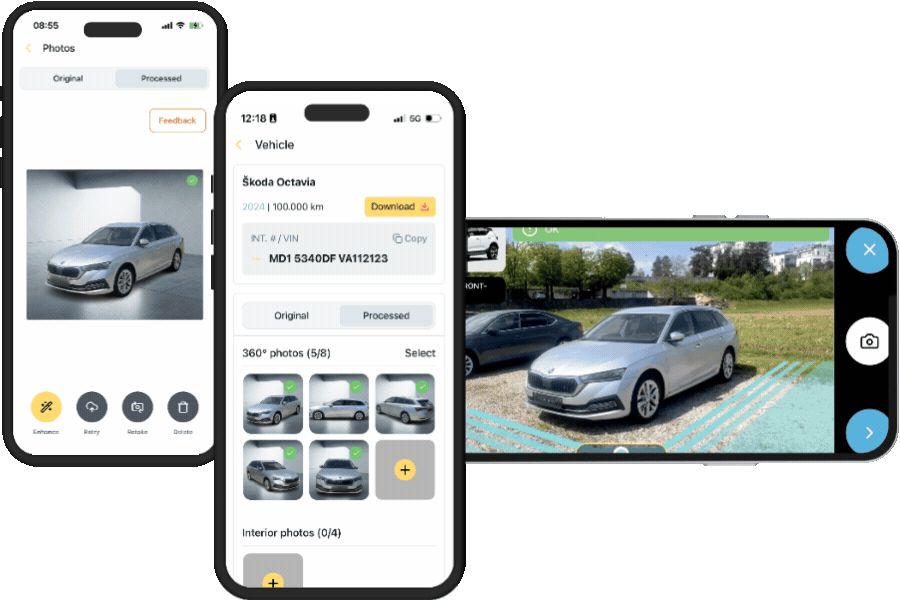
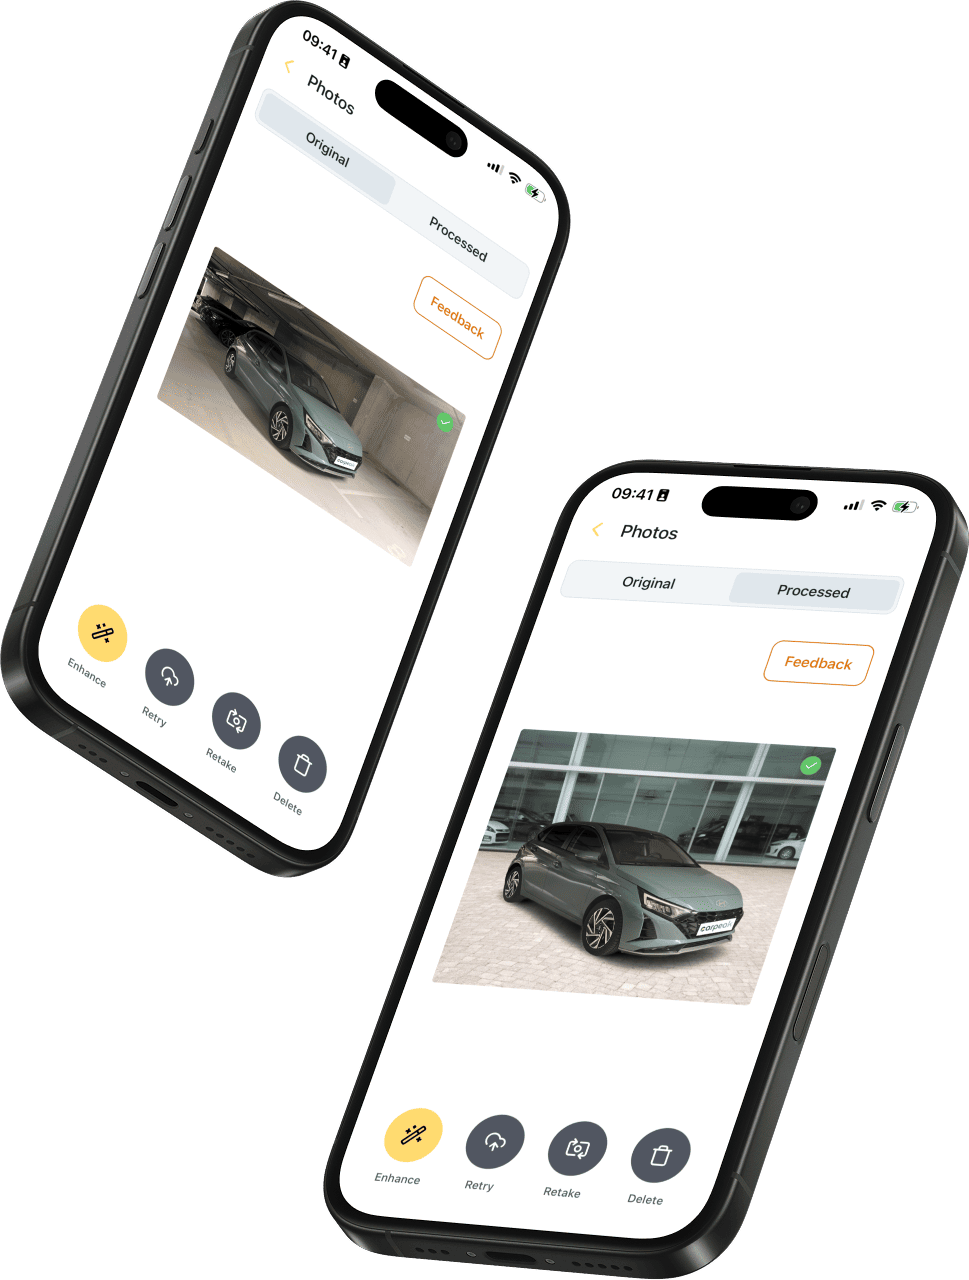
Vehicle Photos
The photo determines whether a buyer will open your listing.

The first photo determines whether your listing even gets a chance.
When buyers browse listings, they don’t start by reading the description or checking the equipment. Their attention is drawn first to the cover photo.

More clicks
Listings with professional, well-presented photos attract more attention and are more likely to be opened by potential buyers.
More inquiries
When a vehicle appears clean, well-presented, and trustworthy in photos, buyers are more likely to make contact.

Higher selling price
A professional presentation can increase the perceived value of a vehicle and reinforce the impression of a serious offer.
Faster sale
Better listings can help vehicles leave your inventory more quickly.
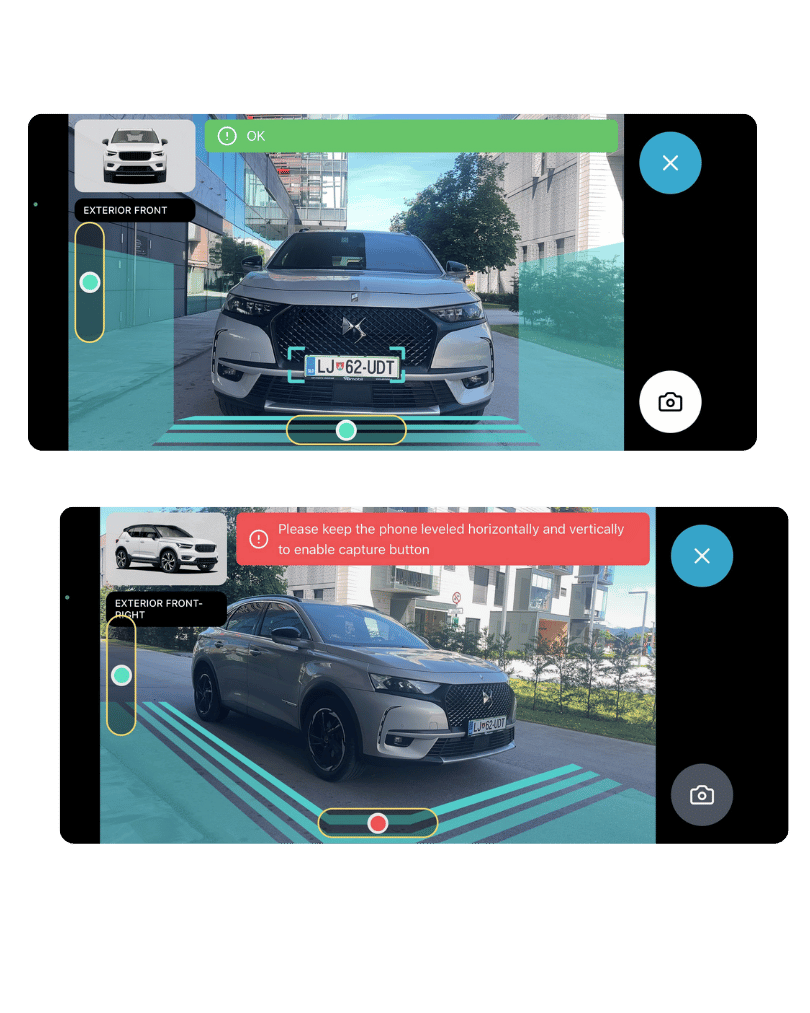
Guided photography
A good photo should communicate everything important within 2 seconds.
CarPeak is a powerful application that guides users through every step of vehicle photography, but it is not a substitute for good photography practices.
To create a final image that attracts buyers, every vehicle photo should meet three basic requirements:
Rule: If the buyer has to think about what they are looking at, the photo is not doing its job.
The best listings are created when you follow a consistent photography process: proper lighting, a clean background, a good shooting angle, sharp images, and a final review before publishing.
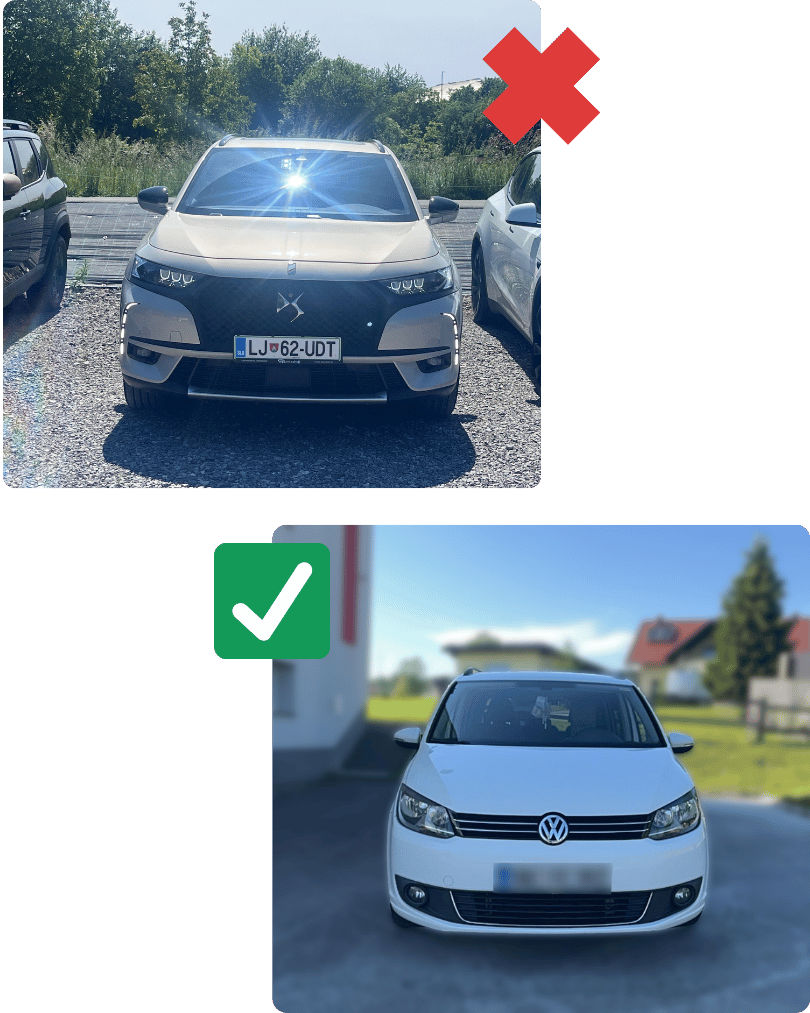
1: Light
Proper lighting is the foundation of a great vehicle photo.
Lighting has the biggest impact on whether a vehicle looks appealing in photos and whether the system can process it correctly. Photos that are too dark, have strong contrasts, or contain harsh shadows reduce cutout quality, hide important details, and create the impression of an unprofessional listing. The goal is not a dramatic photo, but an evenly lit vehicle where the body lines, color, and overall condition are clearly visible.
What to pay attention to:
Tip: Choose one or two standard time slots for photographing vehicles—for example, in the morning or on overcast days. This reduces differences between photos and ensures your entire inventory maintains a consistent appearance.
2: Resolution and sharpness
The quality of the source photo determines the quality of the final result.
During processing, CarPeak adapts photos to the system’s technical requirements. If the original photo has too low a resolution, the system must enlarge it, which can result in pixelation, loss of sharpness, and less accurate vehicle edge detection. Higher-resolution photos can always be safely reduced in size, so it is best to start with an original, sharp image captured directly by your phone’s camera.
What to pay attention to:
Technical note: Modern smartphones generally produce photos of sufficient quality. The important thing is not to reduce image quality in your camera settings and to avoid sending photos through channels that compress them before uploading.
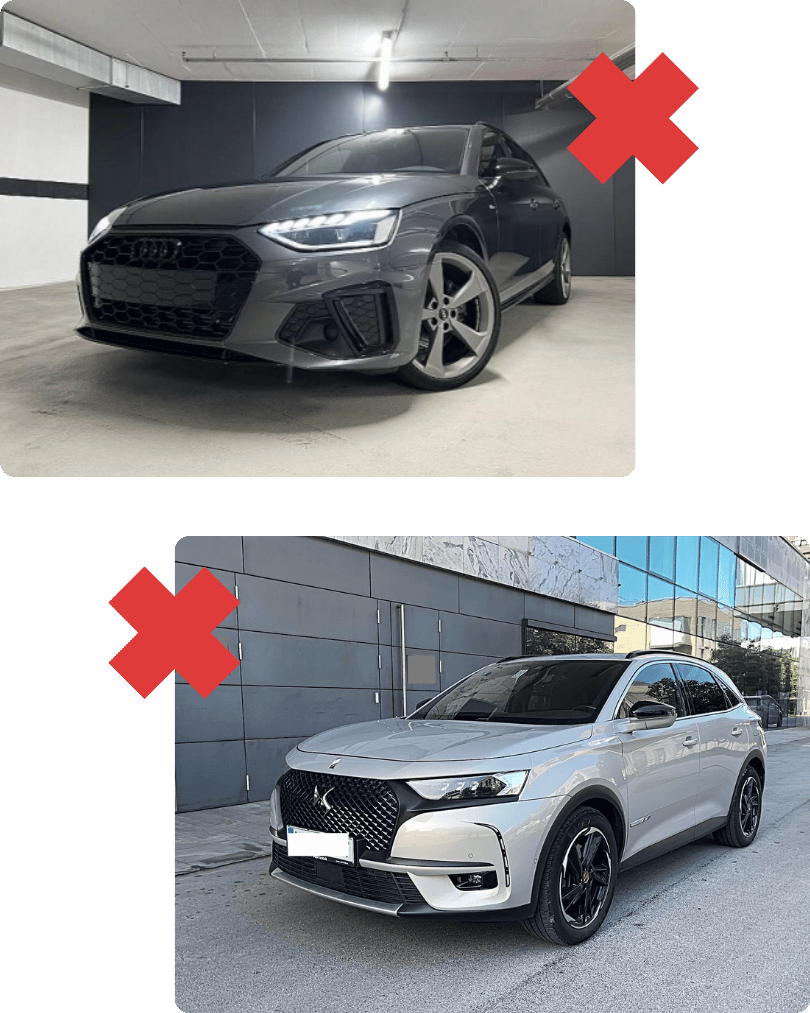
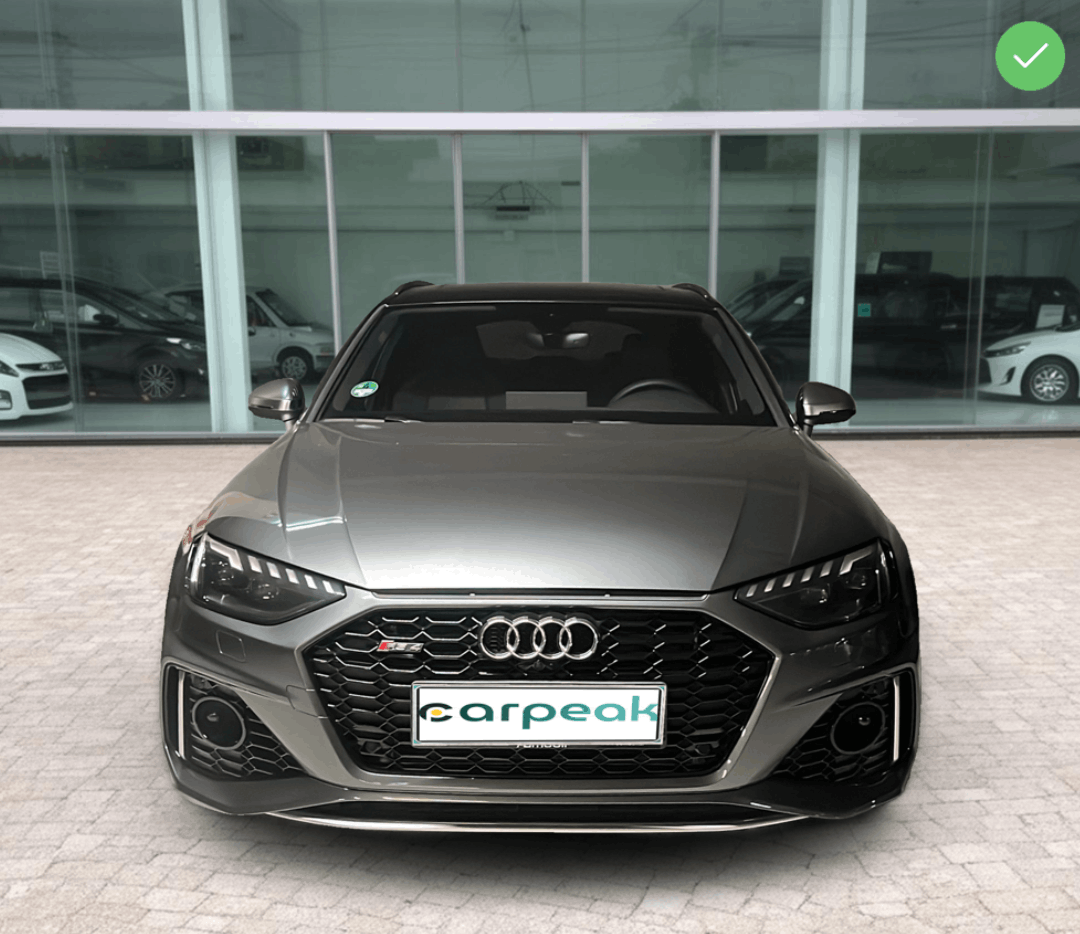
3: Background colour
The background should be sufficiently different from the colour of the vehicle.
For a high-quality cut-out, CarPeak must clearly distinguish the vehicle from its surroundings. If a white vehicle is photographed against a white wall, or a dark vehicle against a dark background, the edges of the bodywork can become difficult to detect. The same issue can occur with snow, light-coloured concrete, dark garages, and heavily shaded areas. Good contrast between the vehicle and the background results in a cleaner cut-out and a more professional final advert.
What to pay attention to:
Recommendation: Choose a permanent location for vehicle photography. The ideal setting includes a simple, neutral-coloured background, sufficient space around the vehicle, and as few other vehicles as possible. Using the same location for every vehicle helps maintain a consistent standard across all your adverts.
A great photo is not a matter of luck. It is a matter of process.
4: Vehicle positioning
Align the vehicle with the guides displayed on the screen.
During the photography process, CarPeak guides you using on-screen markers, lines, and instructions. These guides are not only there to help create a better composition. They ensure that the vehicle is positioned correctly, captured at the right size, properly aligned, and photographed from the intended angle.
If the vehicle is not aligned with the guides, it may appear too close, too far away, tilted, or partially cropped. Such photos look less professional and make it more difficult for the app to create a consistent final result.
What to pay attention to:
Tip: Before pressing the shutter button, check three things: Is the vehicle within the guides? Is the entire vehicle visible in the frame? Is the phone held level? If the answer is “yes” to all three, you are ready to take the shot.
5:Objects in the foreground
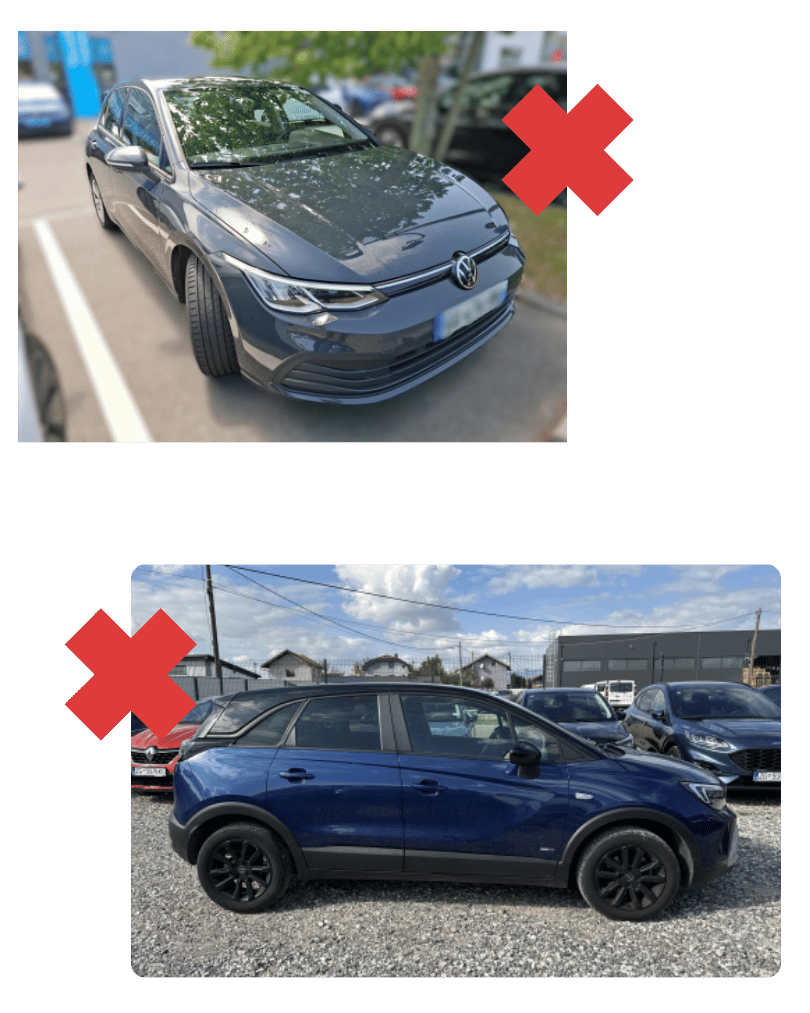
The vehicle must be fully visible – with no obstacles between the camera and the vehicle.
If part of the vehicle is obscured by a post, traffic cone, fence, person, or any other object, CarPeak may struggle to determine where the vehicle begins and ends. This can result in cut-out errors, incorrectly processed edges, or objects being left attached to the vehicle in the final image. To buyers, such photos can appear careless and unprofessional.
What to pay attention to:
Tip: Before every shot, perform a quick check of the frame: Is the vehicle fully visible? Is there anything in front of it? Is your shadow falling across the bodywork? Two seconds of checking can save you from having to repeat the entire photography session.
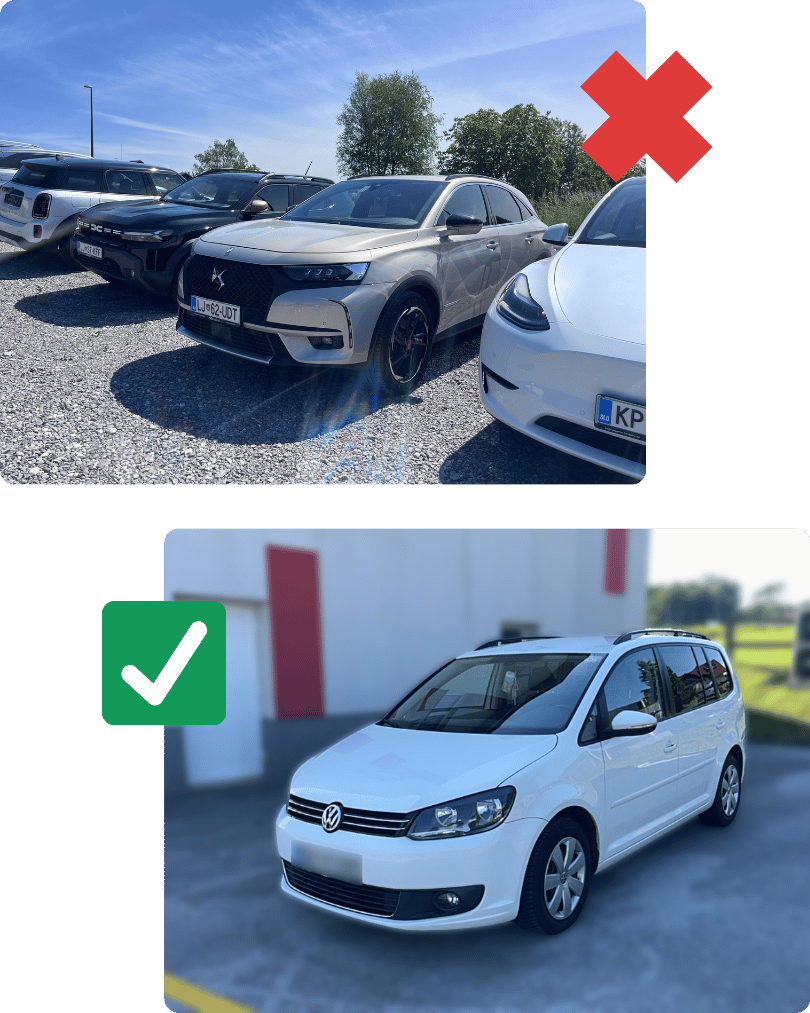
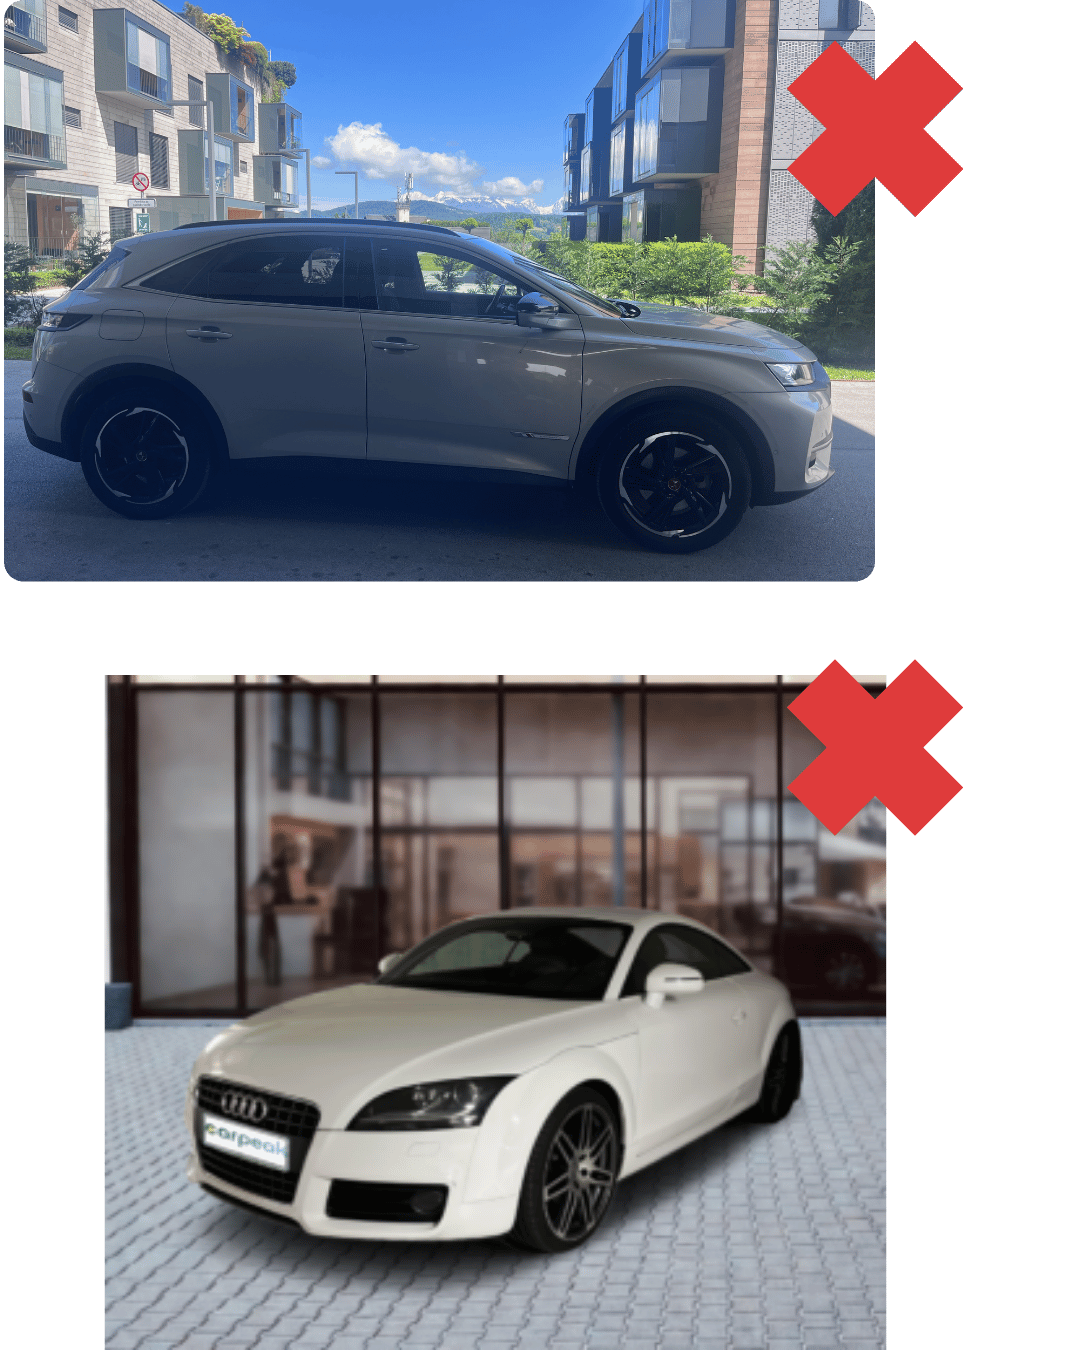
6: Background and surroundings
A clean background helps both the buyer and the algorithm understand what the main subject is.
The photo should clearly communicate one thing: this is the vehicle you are selling. If there are other vehicles, metal structures, fences, roof supports, or a visually busy environment in the background, CarPeak may mistake parts of the background for parts of the vehicle or identify the wrong subject altogether.
What to pay attention to:
Recommendation for dealerships: Create a dedicated photography area. It does not need to be expensive or studio-like – what matters is that it is consistent, spacious enough, and free from distracting elements. This helps raise the presentation standard across your entire vehicle inventory.

A great photo is not a matter of luck. It is a matter of process.
7: Number plates
CarPeak automatically hides number plates, but a final review before publishing is still essential.
The system has been trained to recognise different types of number plates and objects that visually resemble them. It performs reliably when number plates are clearly visible, but exceptions can occur with dirty, very small, partially obscured, or unusual plates. For this reason, checking that number plates have been properly concealed should always be part of the final review process before publishing.
What to pay attention to:
Important: Always review every photo before publishing, including any vehicles and number plates visible in the background.
8: Reflections and lighting effects
Fewer reflections mean a cleaner photo and a better cut-out.
The paintwork, windows, and chrome elements of a vehicle are highly reflective. Reflections of the sky, trees, buildings, other vehicles, people, or strong light sources may appear in photos. These reflections can reduce visual quality, obscure the vehicle’s body lines, and make window processing more difficult. The goal is not to eliminate every reflection, but to minimise strong, distracting, and high-contrast reflections.
What to pay attention to:
Tip: A CPL filter for your phone is a small investment that can significantly improve photos of reflective vehicles. It is particularly useful for dark paint colours, large glass surfaces, and outdoor photography.
9: Windows and glass surfaces
When the background is clearly visible through the glass, the app can process it more accurately.
For side windows and the windscreen, it is important whether the background is visible through the glass or whether the surface is covered by reflections or heavy tinting. When the surroundings are clearly visible through the glass, that part of the image must be processed differently from the vehicle’s bodywork. With very dark windows or strong reflections, the result becomes less predictable, which is why a simple background and even lighting provide the best outcome.
What to pay attention to:
Rule: If you can clearly see a distracting background through the window, the buyer will probably notice it too – and it will be more difficult for the system to process correctly.
10: Mirrors and reflections
Small details can ruin an otherwise great photo.
Exterior mirrors are a small but often problematic part of vehicle photography. They can reflect the photographer, other vehicles, buildings, number plates, or strong light sources. Since mirrors are both part of the vehicle and highly reflective surfaces, they should always be checked carefully before publishing.
What to pay attention to:
Tip: After processing, zoom in and inspect the mirrors carefully. It is a quick step that can prevent highly visible mistakes from appearing in your final advert.
11: Open Doors and unusual positions
For exterior photography, the vehicle should be closed and positioned naturally.
CarPeak delivers the best results with standard exterior photographs where the vehicle is closed, parked on a level surface, and captured from expected angles. Open doors, an open boot, an open bonnet, or partially dismantled vehicles change the shape of the vehicle and can lead to less accurate cut-outs. Such images are useful as additional detail shots, but not as the main exterior photographs.
What to pay attention to:
Recommendation: Start by capturing the standard exterior photo set of the vehicle. Only then add any special shots that help showcase features and complement the advert.
A great photo is not a matter of luck.
It is a matter of process.
When you combine proper vehicle photography, consistent visual standards, and fast publishing, CarPeak becomes more than just a photo app. It becomes a process that helps you prepare every vehicle for sale faster, more consistently, and with a stronger first impression.